Do you want more visitors to sign up for your newsletter? Then it’s time to place at least one signup form on your website or webshop. Maybe you’ve tried this before and placed a form, but it doesn’t work well or no one uses it. With our tips and this guide, it will work better in the future.
What Are the Options for a Signup Form?
There are several options available for creating a signup form for your newsletter.
Signup Forms via Email Marketing Software
The email marketing software you use probably also has a function to create one or more forms. This option is not bad for simple forms and often there is even a plugin available that allows you to easily place such a form on your WordPress website.

Signup form created with EmailOctopus
The Form Widget of Elementor Pro
Have you built your website with Elementor? Then you are surely familiar with the form widget. Besides a contact form, you can also build signup forms for your newsletter. These forms can be placed on any page or inside a pop-up. Using a “form action,” you can then send the signup to the desired email marketing software.
WordPress Opt-in Plugins
There are also several plugins available for creating signup forms. With these plugins, you can build not only the forms but also the pop-ups or slide-ins. In most cases, integrations with popular email marketing systems are also available.
Contact Form Plugins
With almost any contact form plugin, you can also build a signup form. Just like with Elementor Pro, you simply build a form and then link it to the email marketing software. These contact form plugins also have integration functions for the most well-known email marketing systems.
What Is a Good Place for a Newsletter Signup Form?
We often see on websites that the only option to sign up for the newsletter is a form in the footer. This is perhaps the most passive way you can imagine. Ask yourself this question: why would someone sign up for your newsletter? Probably because you have something interesting to say, right? That means you should place your signup form where your visitor can find this information, for example, near the blog posts.
Collect signups for your newsletter via:
- Exit Intent Pop-ups – A visitor leaves your website after viewing/reading a blog post, for example.
- Checkout Page – Does the visitor want to buy something? Then they are probably also interested in your newsletter or product updates.
- Pop-ups or Slide-ins – Has your visitor viewed 3 or more blog posts? Then show a pop-up or slide-in box with your signup form once.
- At the Bottom of the Blog Post – This does not mean you have to show the same opt-in box at the bottom of all pages. You can make the signup invitation relevant for different blog posts (start with the posts that get the most visitors).
- Along with a Freebie – If someone signs up for your freebie, you are not allowed to send them your newsletter according to GDPR. Place an extra checkbox that the visitor must tick to receive the newsletter.
Now that we know where to place the signup form, it’s time to build one.
Building a Form with Elementor
Besides the options mentioned earlier, you can build a signup form with Elementor Pro. You don’t need to write or place any codes and you can fully build the form in the style of your website.
Before you start building…
First, link Elementor with your email marketing software. Standard integrations are available for several systems, such as MailerLite, Drip, and ActiveCampaign. We prefer to work with EmailOctopus, and for this, we have developed a special plugin. Search for EO4WP: EmailOctopus for WordPress in the plugin section of your WordPress dashboard and install the plugin first.
Do you use the basic version of Elementor? Then the form function is not available. Upgrade to Elementor Pro or use the shortcode version of our EmailOctopus plugin. In this case, follow the plugin’s guide.
Building the Form
Building a form with Elementor Pro is very simple:
- Drag the form widget to the place on the page where the form should appear. You will immediately get a basic form with 3 fields.
- Remove the description field.
- Want to add other form fields? Click on “Add Item” for extra fields.
- Modify your form to meet your expectations. Maybe you want to place the fields in one row or adjust the colors and font sizes.
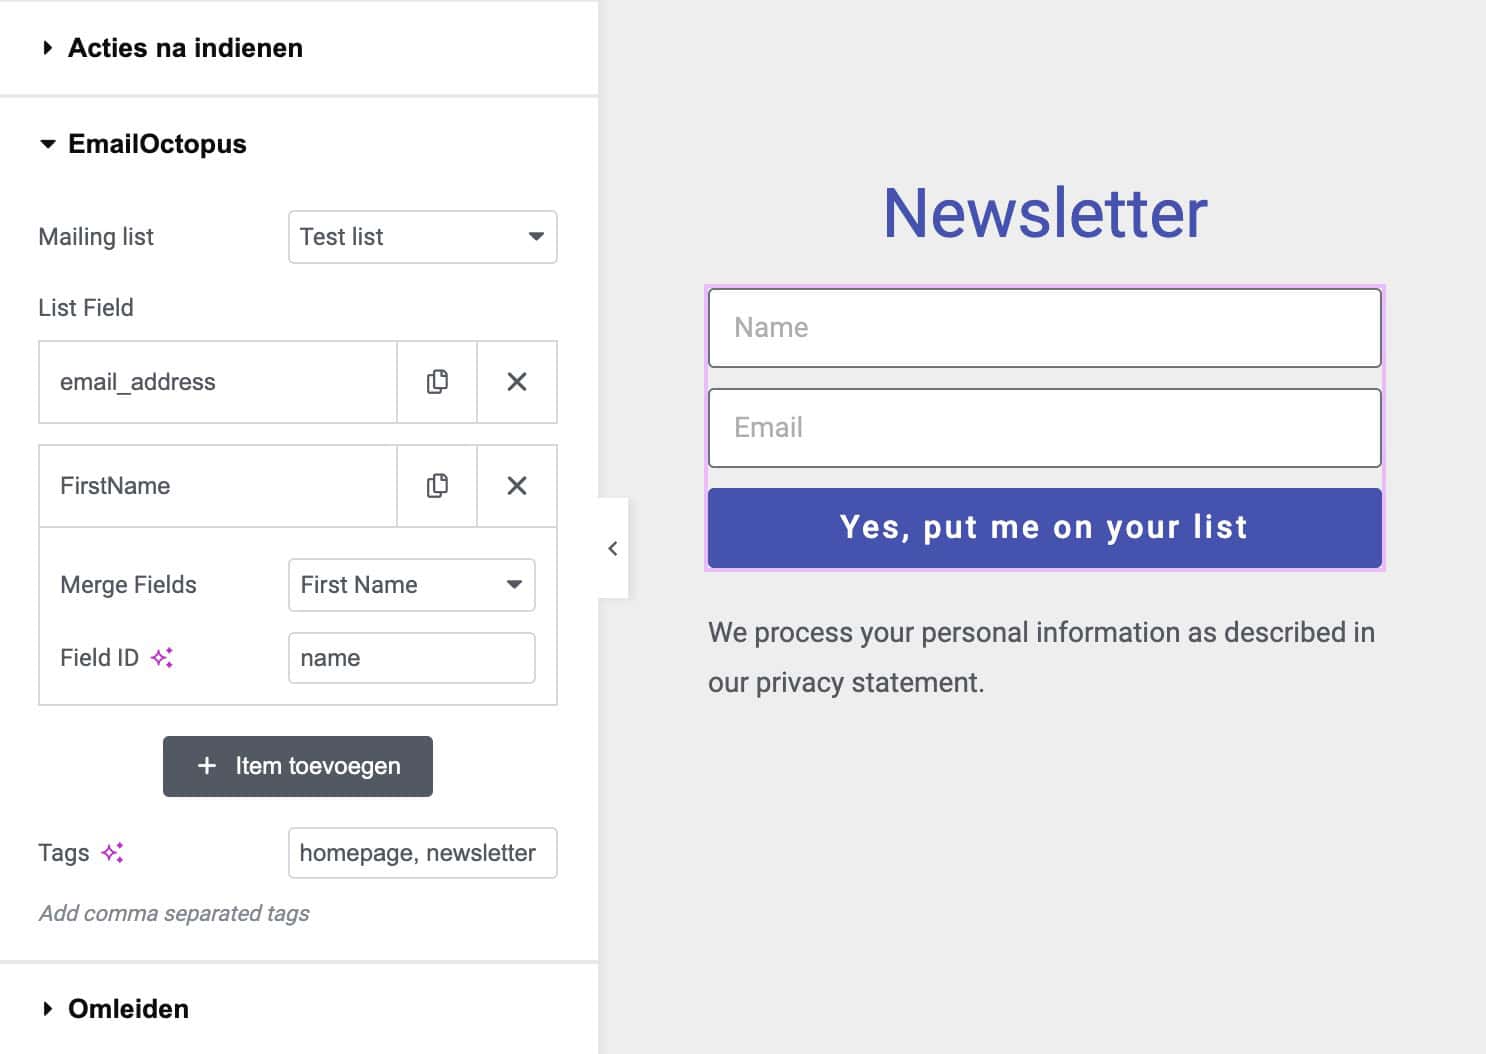
Setting up Form Actions
By default, each form submission is stored by Elementor within WordPress. We are going to change this now.
- Remove the options “Collect Submissions” and “Email” under “Actions After Submit.” You can leave the first option as a backup if you wish.
- Now choose the name of your email marketing provider as an action; for our guide, this is EmailOctopus.
- Open the tab with this name and then choose the desired mailing list from the drop-down menu.
- Now link the various form fields with the “merge fields” available for EmailOctopus. These include “email_address > email” and “FirstName > name.”
- Create a tag to track where the signup comes from. In our example, we entered “homepage.” You can use the tags in EmailOctopus for segmentations or filters.
Elementor Form Action for EmailOctopus
This is just a simple example of a signup page for your newsletter. Maybe you want to combine the “signup” with a Freebie. In this case, create an extra field (type checkbox) and use this field to ask for permission to send a newsletter.
Link this field to the merge field “newsletter” in the EmailOctopus action. With this setting, a tag named “newsletter” will be created for the subscriber. You can then use this tag for segmentation in EmailOctopus.
Do you have different forms, such as signup forms and forms for offering freebies? Then it is best practice to also specify the tag “newsletter” on the signup form. This way, you always see in EmailOctopus who may receive a newsletter and who may not.
Optional: Create and Link a Thank You Page
After the signup, you can choose to redirect the visitor to a thank you page. On such a page, you can say “Thank you” and inform the visitor about other things, such as a special service or offer.
- First, create a page with the desired information.
- Make sure this page is not indexed by Google. You can do this using an SEO plugin such as SEOPress or Yoast SEO.
- Now go back to the page with your signup form and choose “Redirect” under form actions.
- Enter the URL of your thank you page inside the named “Redirect.”
If you don’t use a thank you page, it’s better to also customize the default form messages. You can do this via Additional Options > Custom Messages.
Gepubliceerd in: Tutorials