Email automation campaigns are beneficial for any online entrepreneur. They help you send personalized and relevant emails to your customers automatically. This not only saves time but also strengthens your bond with your customers.
With email automation, you can:
- Save time: Send targeted messages at the right moment.
- Personalize: Send tailored content based on interaction or timing.
- Boost growth: Achieve more customer engagement and higher conversion rates.
In this guide, we will show you how to improve (and simplify) your communication with your customers using EmailOctopus and email automations.
How Does an Automatic Email Campaign Work?
The biggest difference between an automation and a regular email marketing campaign is that with an automation (usually) only one message is sent at a time. For an automation, a trigger must always be called first. The trigger, along with the condition, determines which action is performed.
Do Automations Work Better Than Regular Campaigns?
That cannot be said definitively. The open rate for the automation campaign is usually much higher than for a regular campaign because the recipient has typically performed a prior action. For example, a visitor has filled out a form and is waiting for a freebie. With a regular email campaign, you can reach your entire mailing list in one go, but you do not know if your contacts are ready to read your mailing at that moment. So carefully decide what information you want to send to the subscriber and determine which type of campaign is best.
Setting Up an Email Automation Campaign with EmailOctopus
With EmailOctopus, you can easily set up an automation campaign. You can use various triggers and actions for this. Below, you will find which ones are available, followed by a detailed explanation of the steps needed to set up an automation for sending a freebie.
What Triggers Can You Use?
- Contact subscribed: Basic trigger that is called when someone signs up or when you import new contacts. This trigger only works for new sign-ups.
- Contact field updated: A field is updated with a (specific) value for an existing subscriber.
- Contact tag added: A tag is assigned to an existing subscriber.
- Contact tag removed: A tag is removed from an existing subscriber.
- Manually via another automation: An action from another automation causes this trigger.
- Manually via the API: This trigger is called from an external script via the EmailOctopus API. This trigger can currently be executed only once per subscriber.
What Actions Can You Perform?
When the trigger is executed, you can perform four different types of actions:
- Send email: Similar to sending an email campaign, but only for the selection of subscribers who have been triggered.
- Wait: This step allows you to schedule a pause (minutes, hours, or days).
- Condition: Determine under what condition the next step is executed. Based on the result (true or false), you can determine the next step.
- Action: Possible actions include: updating a field, adding or removing a tag, unsubscribing a subscriber, or triggering another automation.
With these actions, you can achieve a lot, especially in combination with actions from other automations.
Example email automation (step-by-step)
For our example, we assume a sign-up form where visitors can download a freebie. In addition to the fields for name and email address, there is also a checkbox where they can indicate if they want to receive the newsletter. The automation should not only send the freebie but also send a slightly modified email for those who checked the newsletter box.
Unfortunately, you cannot create a form with a checkbox using EmailOctopus’s standard forms, but you can with our EmailOctopus plugin. Both the shortcode function and the Elementor integration can handle this situation. Not using our EmailOctopus plugin for WordPress yet? Install it right away, it’s quick and easy via the plugin section in your WordPress dashboard.
Does your form work and are the sign-ups coming into EmailOctopus? Follow these steps to set up your email automation:
- In EmailOctopus, choose “Automations” and then “Create”.
- Choose the mailing list for which you want to create the automation and click “Save & next”.
- Choose “Contact subscribed” as the trigger and click “Next”.
- Disable the “Include imported contacts” option if not desired and click “Save & close”.
- Click the plus sign and choose “Condition”.
- Edit the condition by clicking the three dots and choose “Edit step”.
- Set the condition to consider the “newsletter” tag. This tag is automatically sent when you create the form with our plugin (Elementor form or WP shortcode). Click “Save & close” to close the box.
- You will now see two options, “Yes” and “No”. Click the plus sign for “Yes” and choose “Send Email”. Click the three dots again and choose “Edit step”.
- Fill in the various fields for your email and choose a clear email subject. Then click on “Select a template”.
- Choose how you want to format the email. Have you previously created your own email template? Choose your template or one of the “Basic” example email templates.
- Build your email, including the information that the subscriber wants to receive your newsletter. Click “Save & close” to complete this step.
- Repeat the steps for the “No” case and use for this version the email text without the newsletter sign-up information.
- Click “Start” in the upper right to activate the automation.
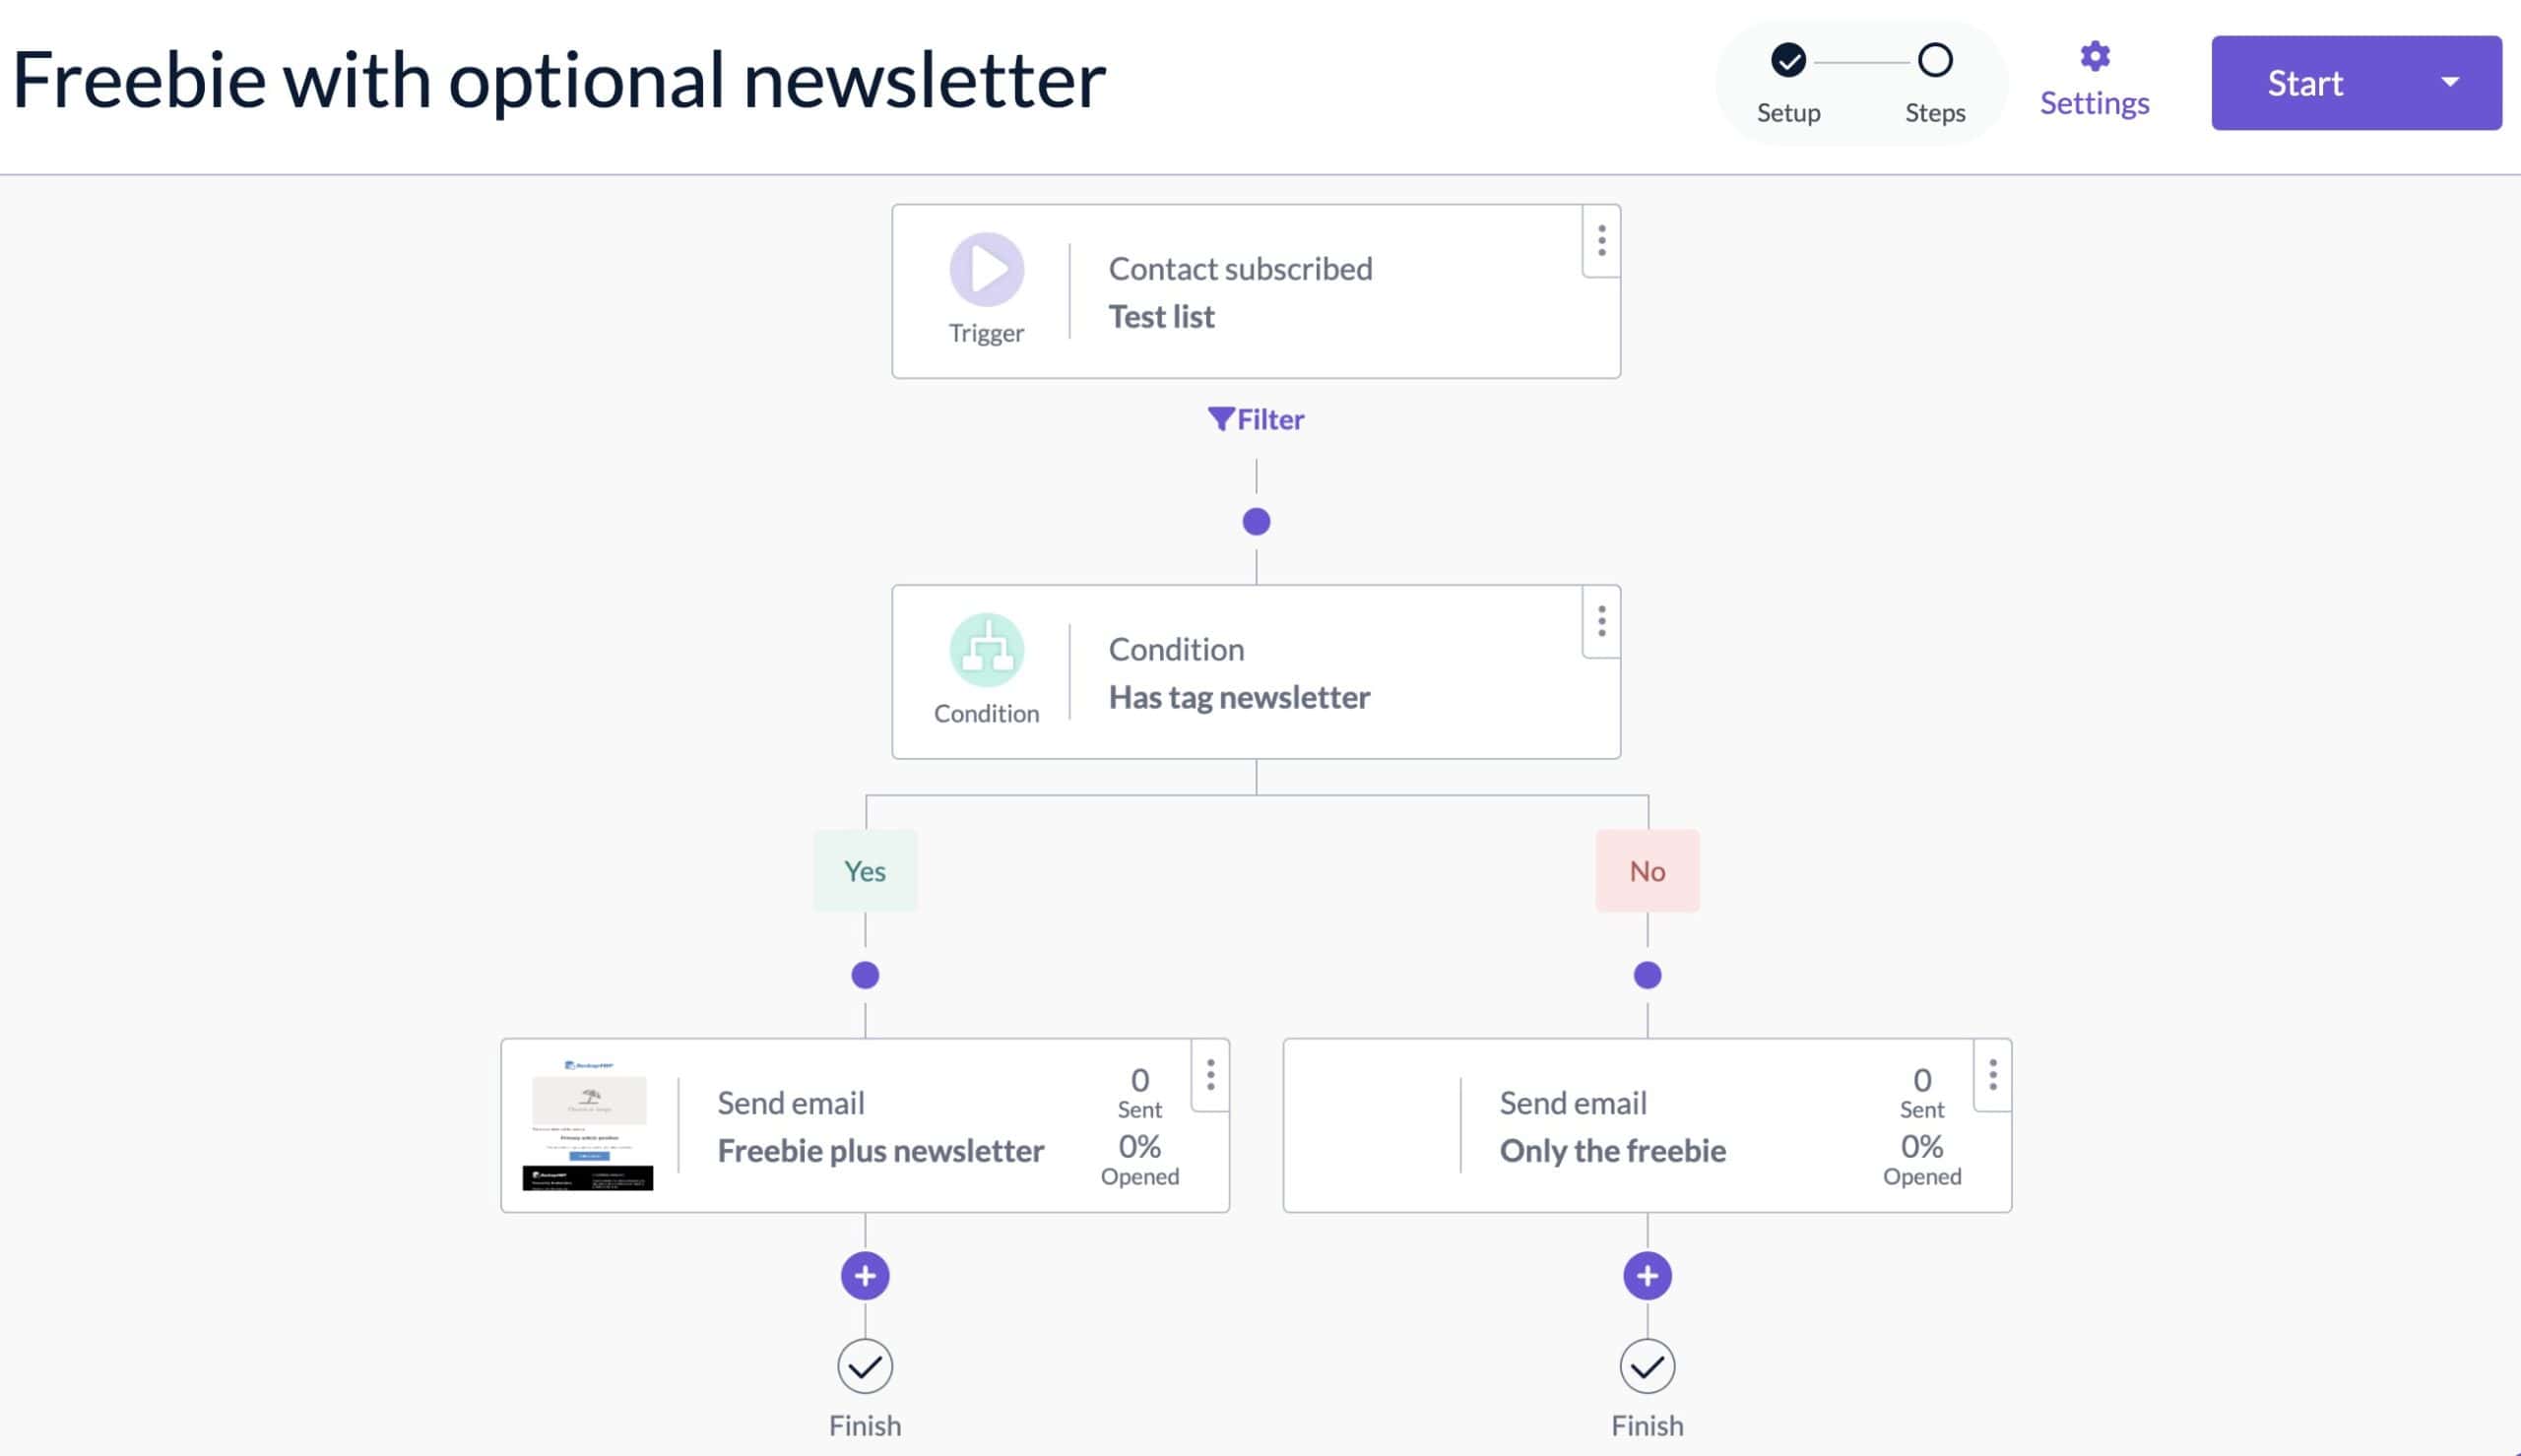
EmailOctopus automation, the different steps
This automation is just an example of how you can process sending a freebie and optionally a newsletter sign-up in EmailOctopus with a few steps. Ready for your next email automation?
More Applications for Email Automations
With email automations, you can simplify various tasks and perform them at a specific time:
- Drip campaigns: Send a series of emails with a pause of X days between them.
- Subscriber update: Update your mailing list based on a new interaction, such as the purchase of a specific product.
- Unsubscribe via the API: EmailOctopus does not have a separate unsubscribe link (only via the link you place in each email), but you can build your own form and process the unsubscribe via the API. You can also send a “Goodbye” email in the same automation.
- A/B testing: Using the “Condition” action, you can set a condition and send two different emails for A/B testing.
- Follow-up emails: Just like the “Welcome” email, you can also send a second email later, such as after a sale, with tips for using the purchased product.
With our WordPress plugin for EmailOctopus, it is possible to easily add extra data, such as tags, to a sign-up form. Do you have a webshop with WooCommerce? Then you can also add a subscribe checkbox to your checkout page with the same plugin.
Gepubliceerd in: Tutorials