Are you looking for a contact form plugin that includes all the essential features, Which is easy to use and efficiently prevents spam? Stop searching and discover what our plugin can do for your website.
On this page I will tell you more about the plugin’s features:
- Create and embed contact forms
- Autoresponders
- Collect submissions and other settings
- Spam protection
- WordPress hooks
Do you need support for this plugin? Please post your question via the plugin support forum at wordpress.org.
General plugin installation
The installation of the plugin is the same as with any other plugin that you can install via the WordPress repository.
- Go to Plugins > Add new plugin via your dashboard and search for “fws contact form”.
- Install and activate the plugin with the name “Ajax Contact Form” that appears.
For users still using the old shortcode version!
If you have been using the plugin for a while, you may want to switch to the new post-based form function. In this case, the attributes and properties are no longer set via the form shortcode but through a user-friendly interface.
You can continue to use the old version for the time being, but we will no longer develop new functions for it.
Create a new contact form
After activating the plugin, you can start creating your first form right away.
Navigate to ‘Contact Form’ and click the ‘Add New Form’ button. The next screen allows you to enter all attributes and properties. Start with a descriptive title for your form. This title is only visible within the WordPress dashboard.
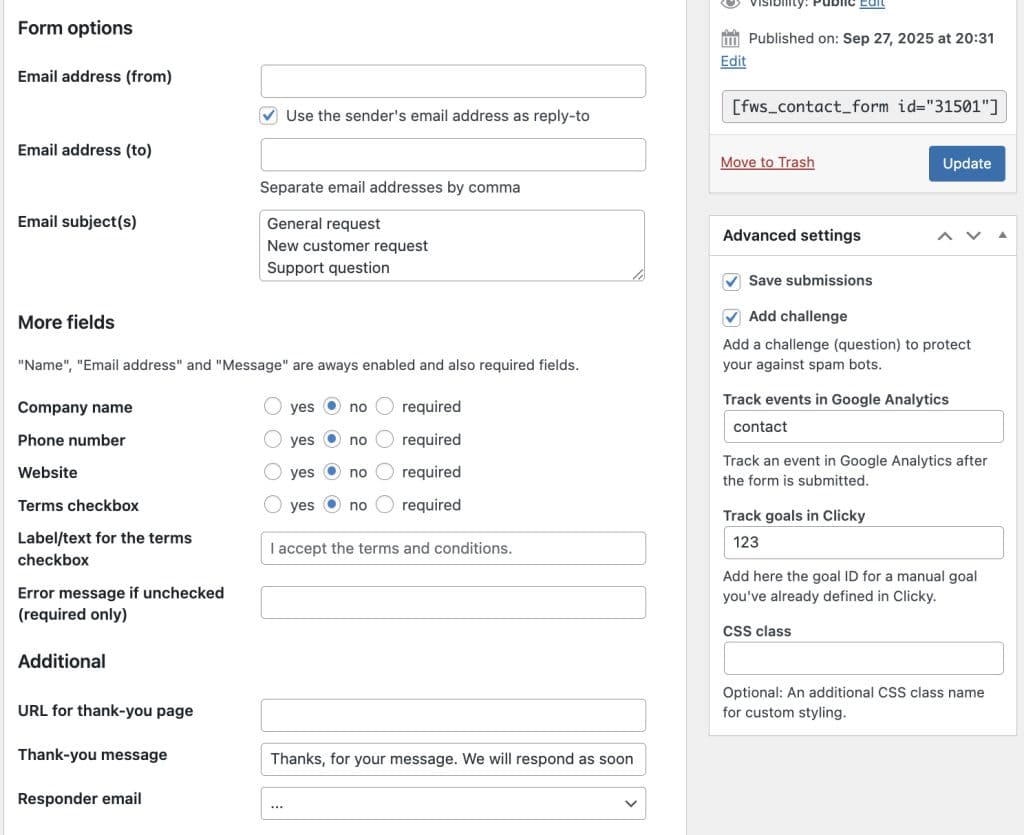
Contact form post options
Form Options
- Email address (From): The email address from which notifications and autoresponders are sent.
- Add Reply-to header: Use this option to add a reply-to header to the email. The plugin will use the email address from the submitted form.
- Email address (To): One or more email addresses to which notifications of new messages should be sent.
- Email subject(s): Enter one or more email subjects. If only one is provided, it will be used for notifications. If multiple subjects are entered, a dropdown menu will be created in the form, allowing visitors to choose a subject.
More Fields
As indicated on the screen, basic fields are mandatory and cannot be changed.
For the following fields, you can choose whether they are visible, hidden, or required:
- Company name
- Phone number
- Website
- Terms Checkbox
The terms checkbox can be used for various purposes, such as agreeing to terms and conditions, a privacy policy, or subscribing to a newsletter.
The following two fields work in conjunction with the terms checkbox:
- Label/Text for the terms checkbox: The text displayed next to the checkbox.
- Error message if unchecked (required only): A custom error message shown when the checkbox is required but not checked.
Additional
- URL for the thank-you page: Redirect visitors to another page after submitting the form. This can be an internal or external URL.
- Thank-you message: The success message displayed after form submission.
- Responder email: Select the autoresponder to be used (must be created first).
Advanced settings
- Save submissions: Enable this option to store form submissions in the database. It’s recommended to save submissions temporarily and check them regularly in case an email notification is missed.
- Add challenge: For additional spam protection, you can add a simple and accessible challenge to your form.
- Track events in Google Analytics (v4): Enter an event name to track form submissions in Google Analytics over a specific period.
- Track goals in Clicky: If using Clicky Analytics, enter the goal number you created in Clicky.
- CSS class: Add a unique CSS class name to apply custom styling to the form.
Click “Publish” to activate your form. Above the button, you will see a shortcode like [fws_contact_form id="123"], which you can insert on a page. Do you use the block editor (Gutenberg)? Then you can insert the form via a block. The block has the same name as the plugin.
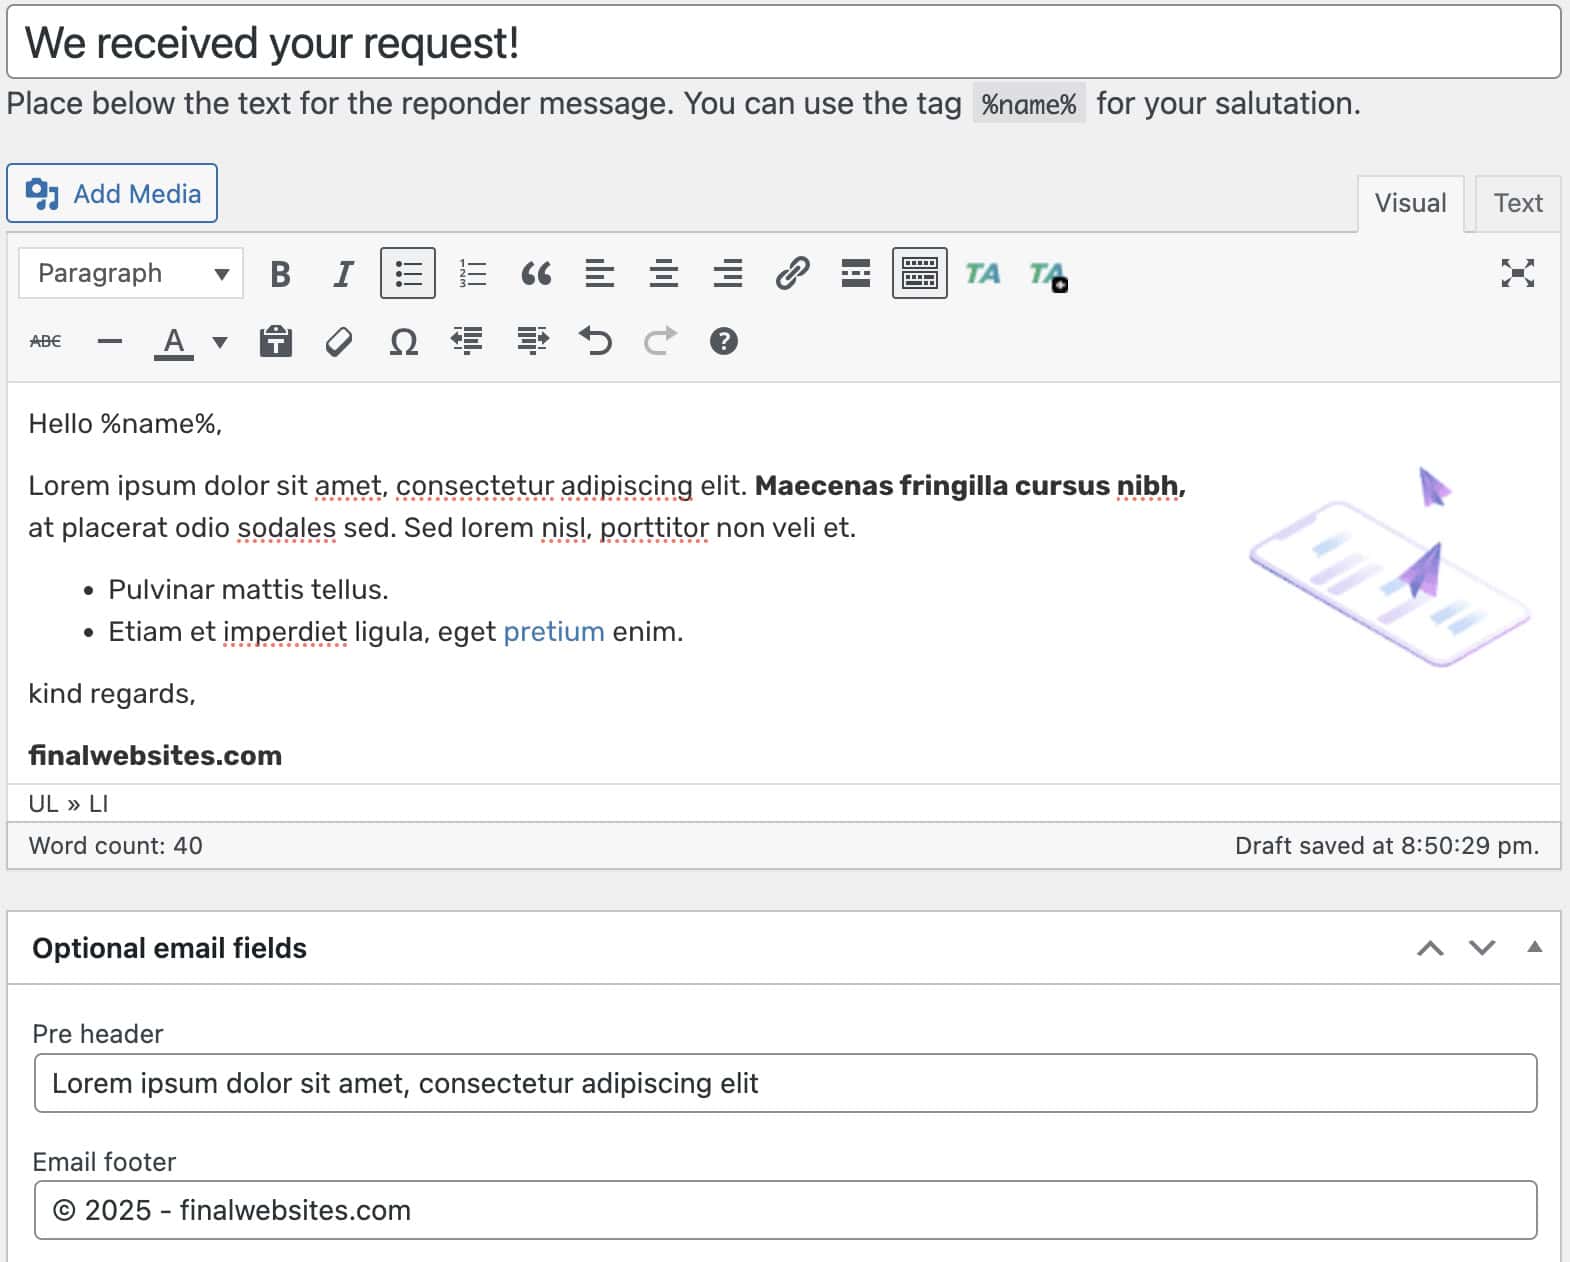
Set up autoresponders
I recommend always sending an automatic reply when someone fills out your contact form. This reassures the visitor that their message has been received and also allows you to include useful information, such as a follow-up action (e.g., calling your business or exploring other parts of your website).
Autoresponder post example
Setting up an automatic reply consists of just three parts:
1) Title
Not much needs to be said about the title—simply choose a clear subject line that will also serve as the email subject.
2) Email Body
The email content is sent using an HTML email template, allowing you to include a logo, add links, and format your text with basic HTML elements.
You can use the variable %name% to personalize the message.
3) Optional email fields
At the bottom, there are two additional fields you can fill in:
- Email address (Bcc): Add one or more email addresses here to which you want to send a blind carbon copy.
- Preheader: A short introductory text that appears in the email preview in services like Gmail.
- Email footer: Use this section for your company name, address, or Chamber of Commerce number.
Final Step
Once you’ve saved your email message, go back to your form and select the autoresponder under Additional > Responder Email.
Here’s an example of what such an email looks like:
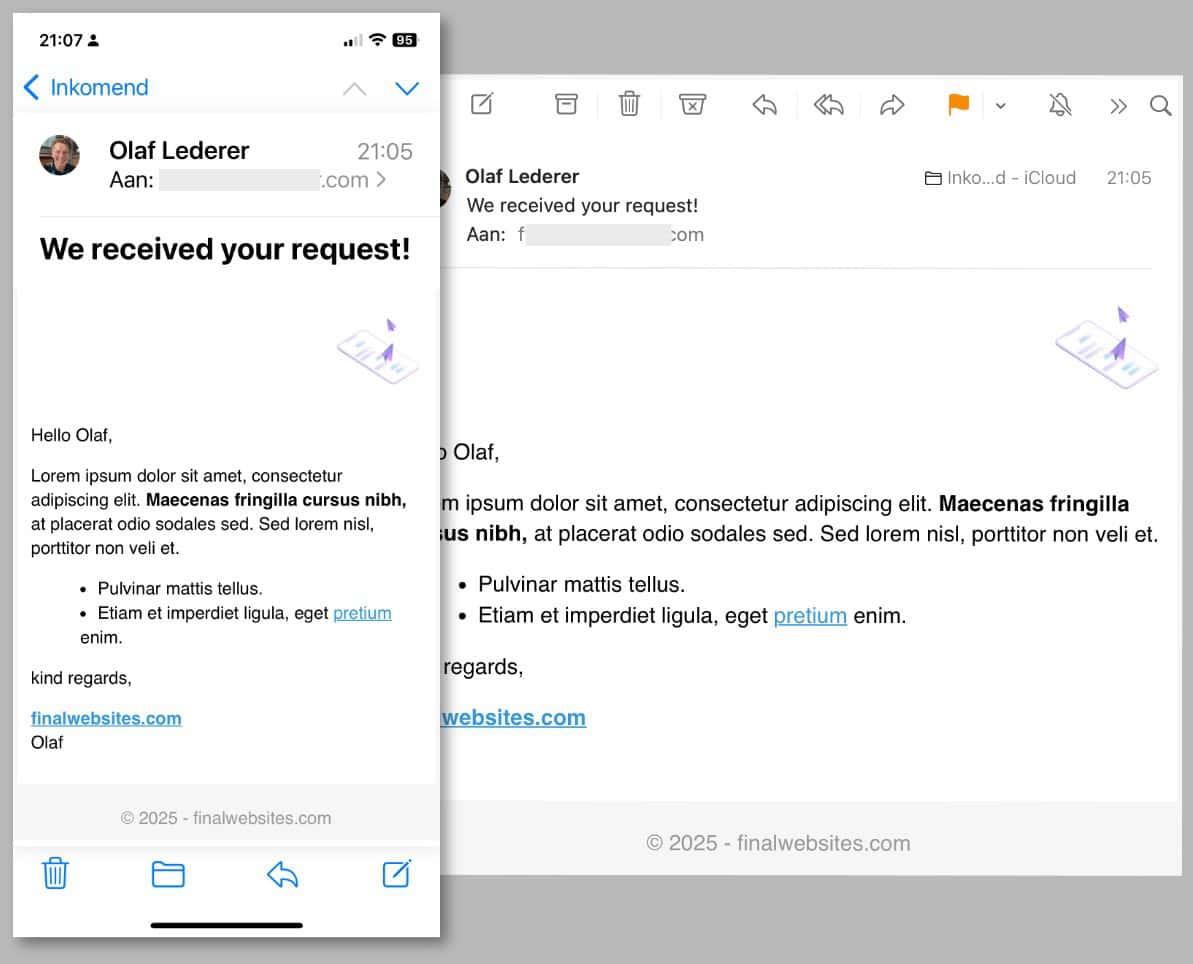
Autoresponder emails (mobile & desktop)
Collecting submissions
When you enable the “Save submissions” option for a form, each submission is stored as a post in WordPress. You can view and delete these posts if needed, for example, to comply with privacy laws in your country.
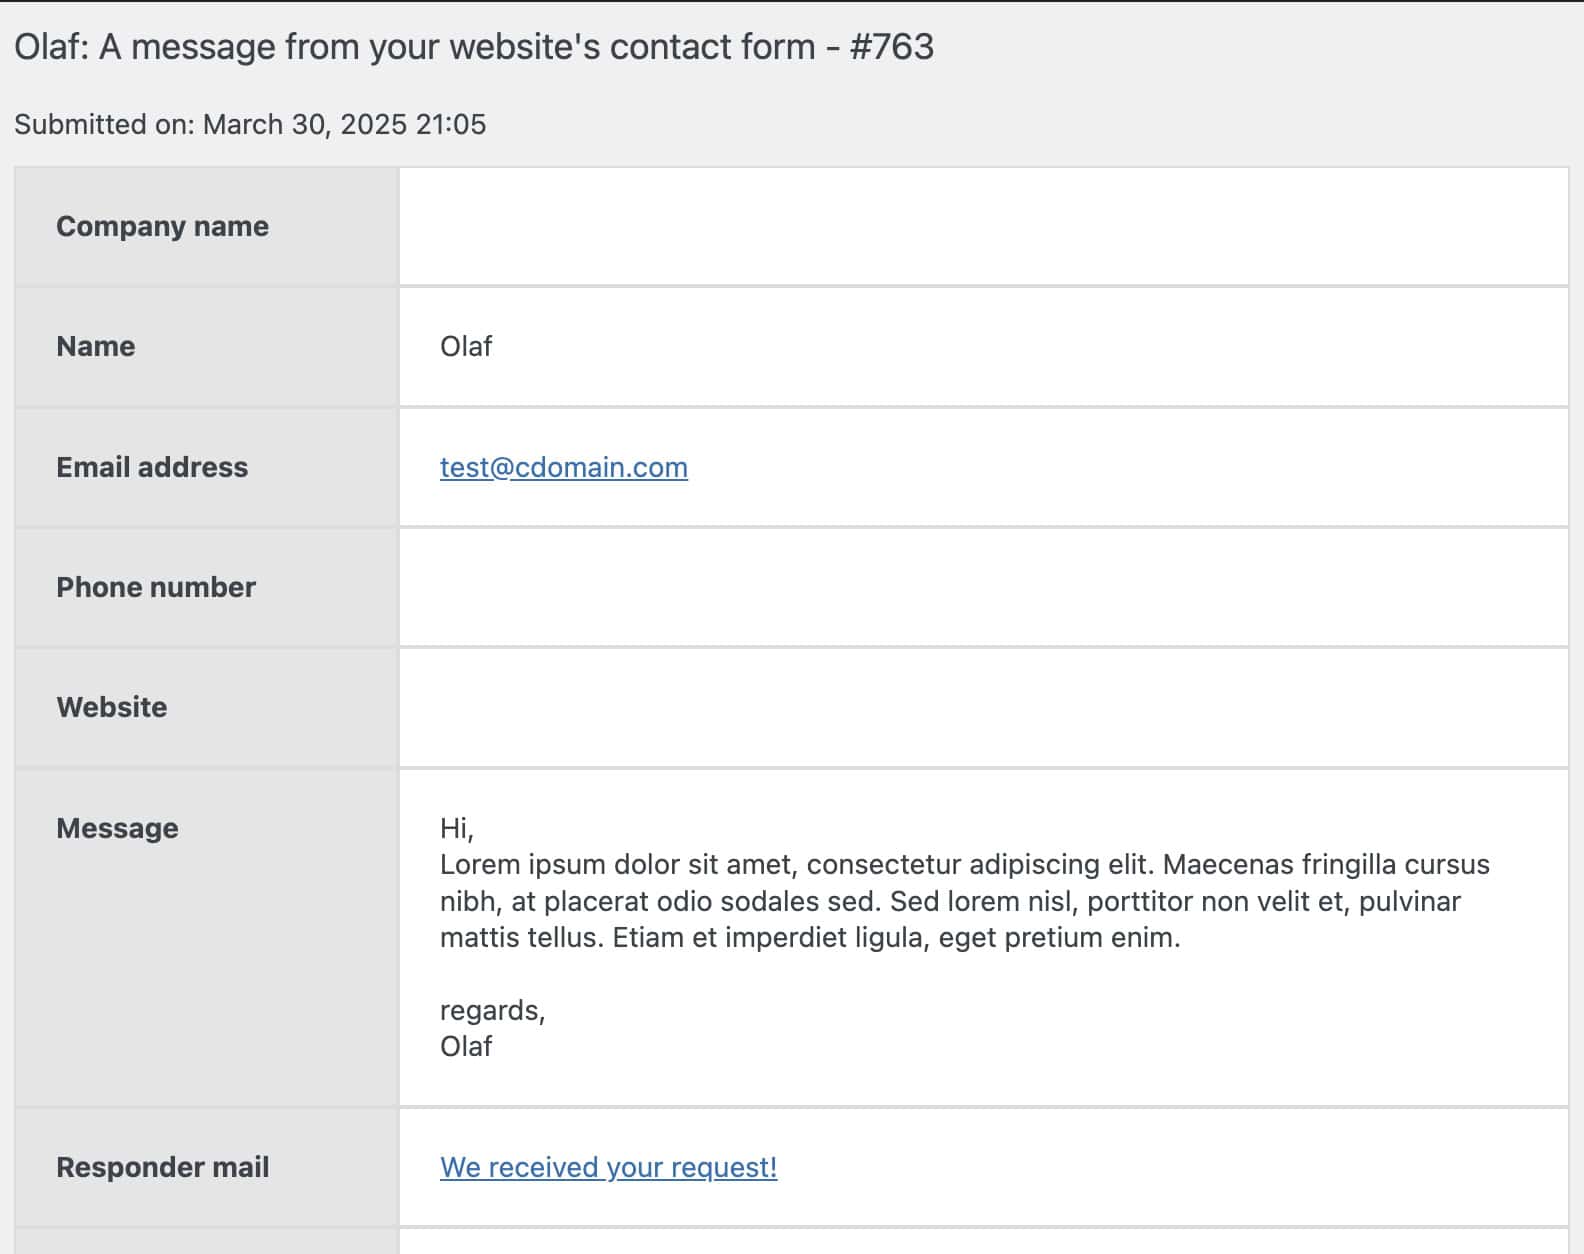
Contact form submission example
For each submission, in addition to the completed form fields, you will also see:
- Date and time of submission
- The page from which the form was submitted
- The visitor’s IP address and user agent
Plugin settings
You can find additional settings under Contact Form > Settings. These are divided into two tabs.
Ajax Contact Form plugin settings
Configuration
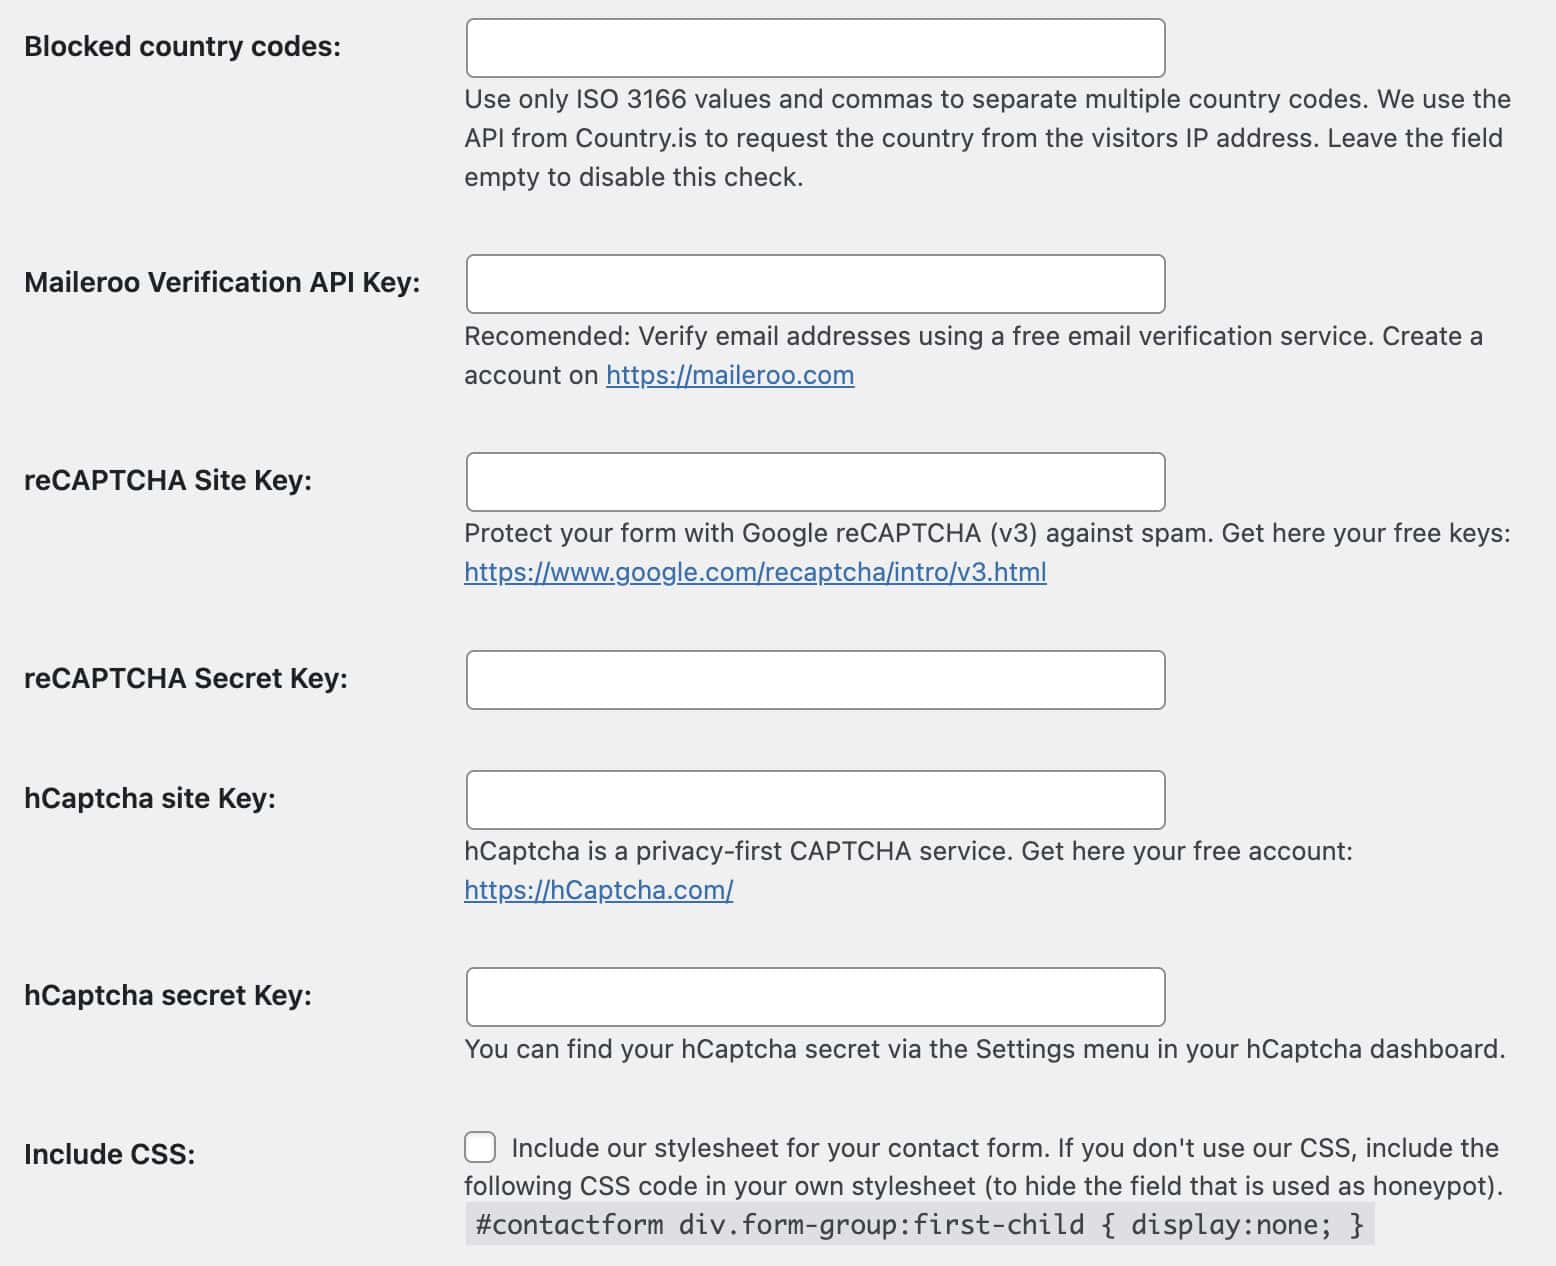
- Maileroo Verification API: Enable this option if you want to use Maileroo’s free email address verification API. An API key is no longer required.
- Turnstile Site Key and Secret Key: Get more protection for your contact forms with Cloudflare Turnstile. Enter both keys to enable this feature.
- hCaptcha Secret Key and Site Key: Similar to reCAPTCHA by Google but with better privacy protection for visitors. Additionally, hCaptcha states that its widgets are more accessible to people with disabilities.
- Include CSS: Enable this option to apply the plugin’s default styling to your forms. If you prefer custom styling, add the following CSS code to your own stylesheet:
#contactform div.form-group:first-child { display:none; }
This code hides the honeypot field used for spam protection.
Default form settings
The second tab allows you to save default settings, so you don’t have to re-enter all the details when creating a new contact form. The various fields in this section have already been covered in the form creation section.
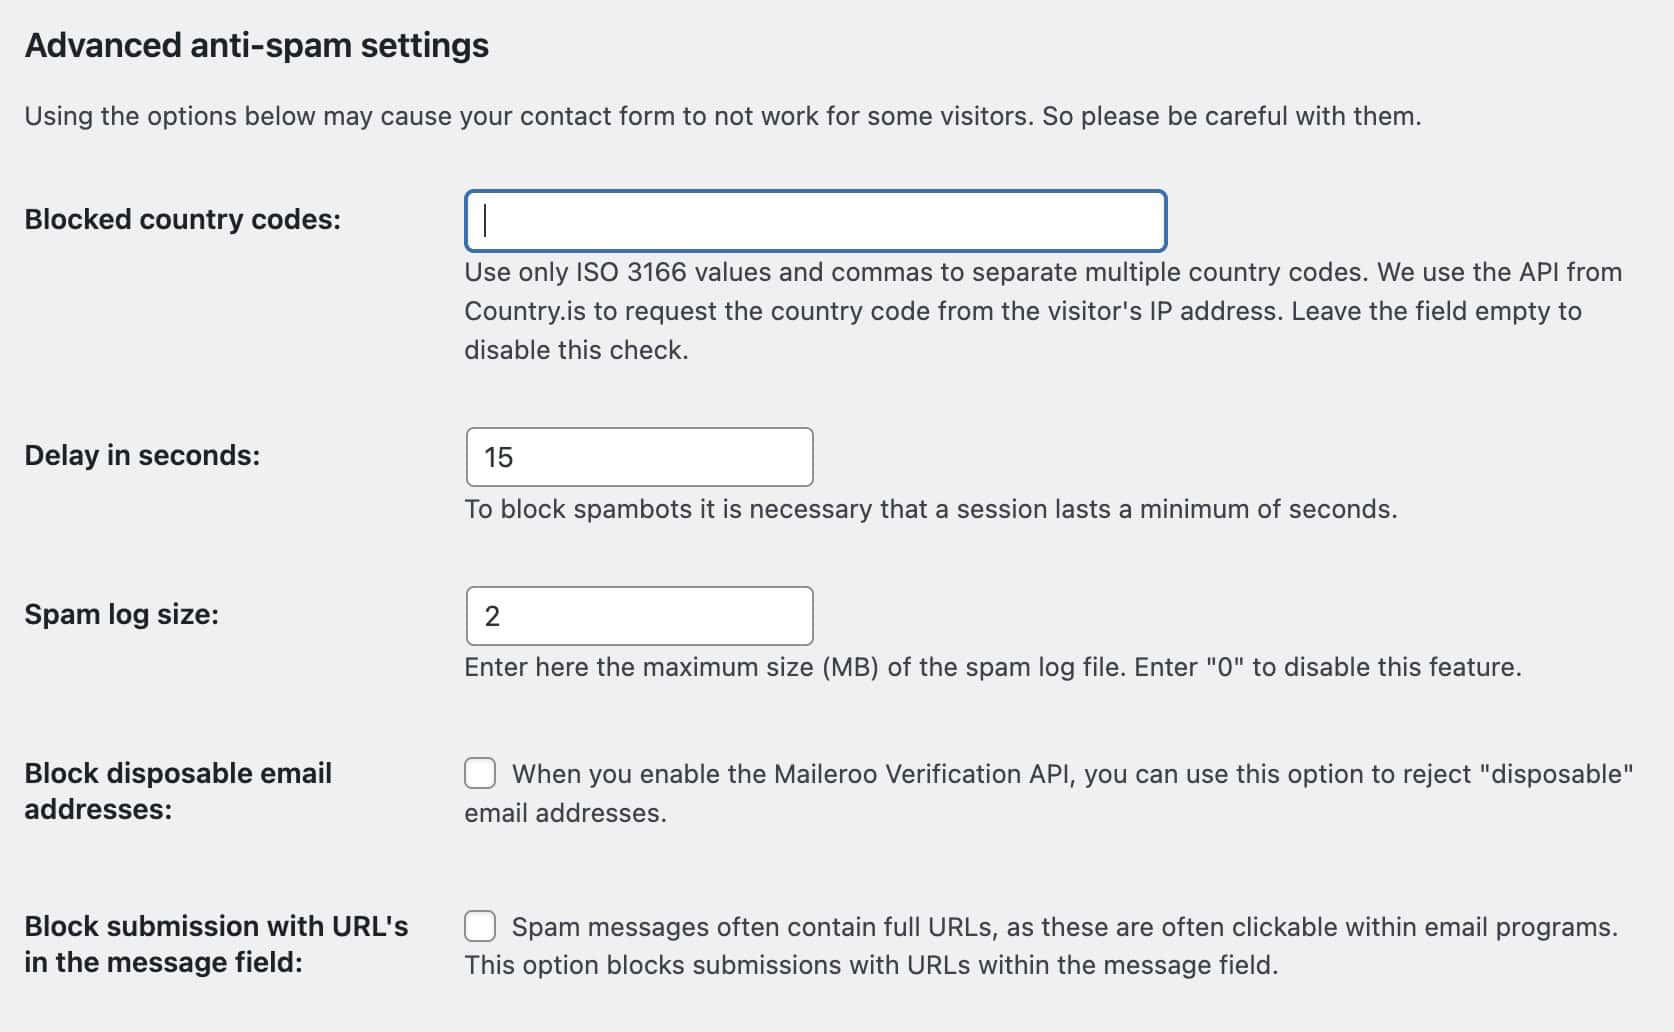
Advanced anti-spam settings
Advanced anti-spam settings
- Blocked Country Codes: Do you frequently receive unwanted messages from countries where you don’t do business? Enter the two-letter ISO codes of the countries you want to block, separated by commas.
- Delay in seconds: The minimum of seconds a visitor need to stay on your website, before a form will be submitted.
- Spam log size: How big can the log file for collecting spam attemps be?
- Block disposable email addresses: When you enable Maileroo’s email verification, you can use this option to reject “disposable” email addresses.
- Block submission with URL’s in the message field: Select this option if you want to block submissions that contain URLs.
How does spam protection work?
A “Honeypot” (a hidden form field) is added by default for each form. If a bot fills in the field, the form will not be processed. In addition, the plugin works with a cookie. This cookie is placed upon arrival on the website. If a form is then sent within (standard) the first 15 seconds, the submission will be blocked. The other methods to fight spam are:
Cloudflare Turnstile and hCAPTCHA
Both services validate the submission using an external server. If a submission appears “suspicious”, a window will appear where the visitor must perform additional actions.
Block a submission based on the visitor’s country
You can specify one or more country codes via the plugin settings. When submitting a form, the visitor’s country code will then be retrieved based on the IP address. If the country code is listed in the settings, the submission will not be processed ,and the visitor will receive a notification.
Support for WP Armour – Honeypot Anti Spam
The form plugin has an integration with WP Armour. Once you install this plugin, the integration is activated automatically. I recommend using WP Armour, also for securing standard WordPress forms (login, registration, comments).
Challenge the visitor
This method allows you to verify that the sender of a message isn’t a robot by asking a question. A question is randomly selected, and the visitor must answer it with a number.
Spam logs
Our plugin has several options to prevent spam. The best option for your website and form may vary. Enable this option and check spam attempts after a few days; you’ll be surprised by the results. If you don’t see any spam logs after a few days, you might be lucky and the spam bots haven’t discovered your contact form yet!
Via the recent spam logs page you can see 25 spam attempts. If you have many of them, you download the whole list via the link at the bottom of the page.
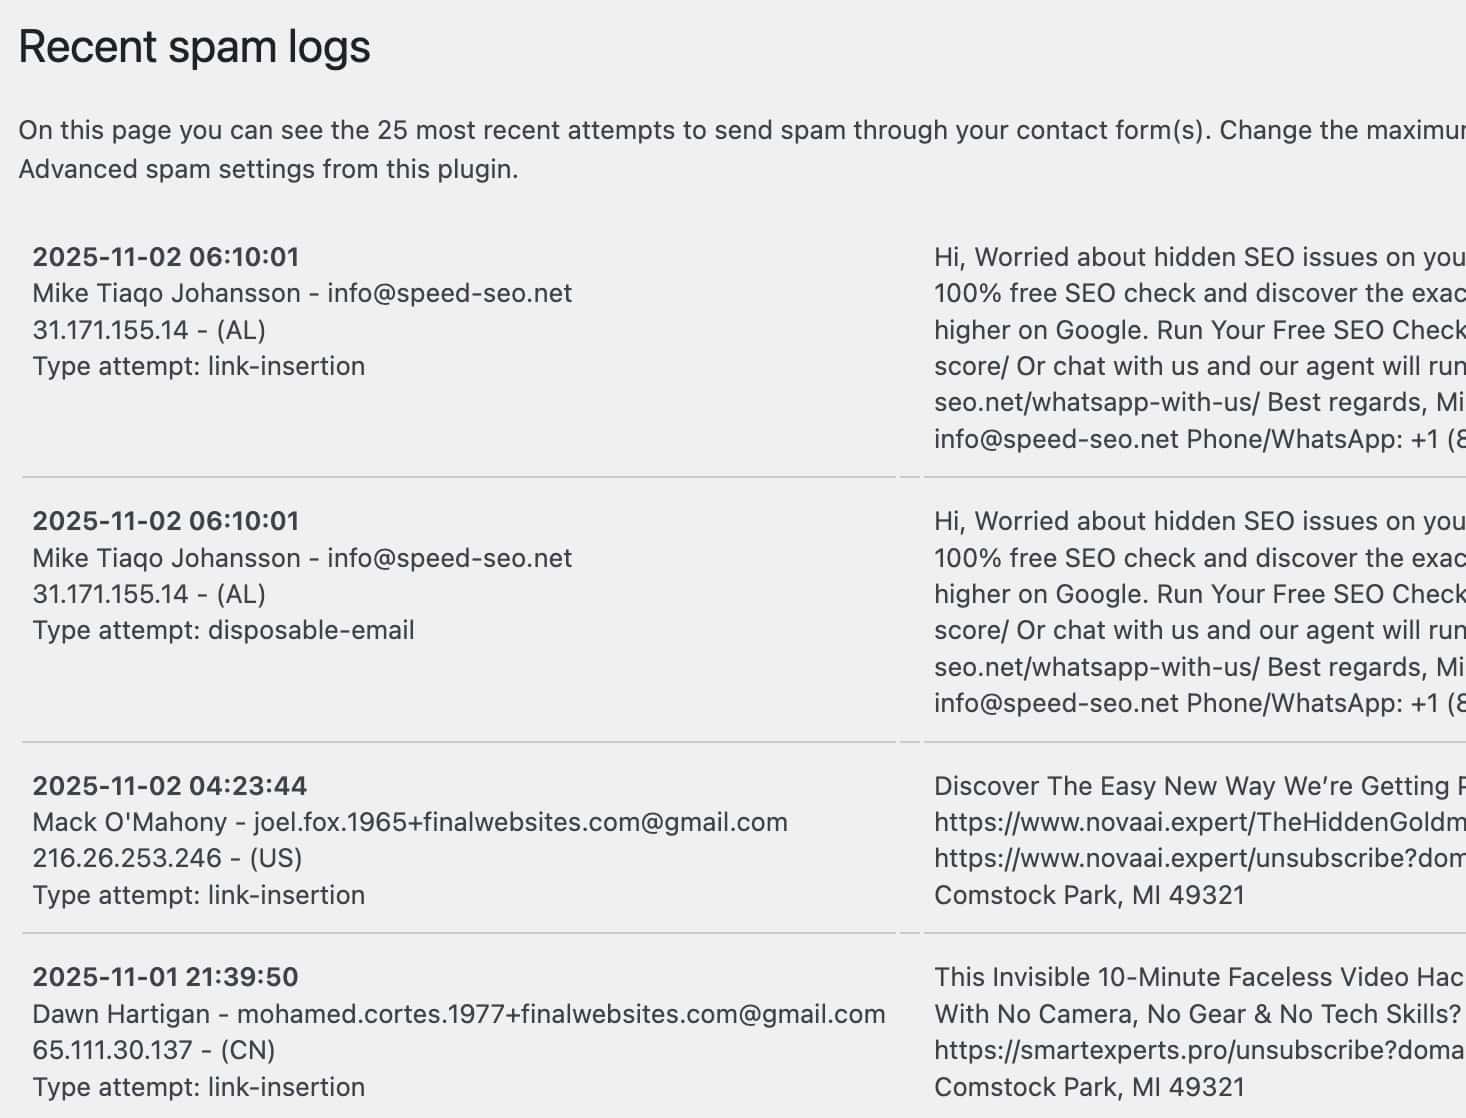
Recent spam logs
For developers
The plugin currently has one action hook that allows you to manipulate its behavior.fwsacf_after_success_form
This hook enables you to perform an additional action after successfully submitting the form (and the associated emails). A common use case is using the terms checkbox as a trigger for a newsletter subscription..
The following example shows how to use the action hook to add a subscriber to EmailOctupus. For this example we use the “terms” checkboz to add a newsletter subscribe option to the contact form.
Frequently Asked Questions
Can I add extra fields to my form?
We have kept the plugin simple. If you want to build more advanced forms, we recommend using plugins such as Gravity Forms.